Stimulus
This tutorial will walk you through the fundamental ideas of Stimulus by illustrating how to construct many fully working controllers.

Table Of Contents
- What is Stimulus?
- Why Stimulus?
- How does Stimulus works?
- How to install Stimulus
- Modify Welcome Page
- Hello Controller
- Attach Hello Controller
- Controller Action
- Targeting Elements
What is Stimulus?
Stimulus is a JavaScript framework that has modest goals. Stimulus, unlike other front-end frameworks, is intended to improve static or server-rendered HTML— the “HTML you already have”—by connecting JavaScript objects to page elements using simple annotations.
Why Stimulus?
Stimulus leaves most options open to you, but it does provide a consistent manner of doing things. It allows you to create and use reusable controllers to provide an extra layer of interaction.
How does Stimulus works?
Stimulus uses simple annotations to connect JavaScript objects to page components. These JavaScript objects are known as controllers, and Stimulus checks the page for the appearance of HTML data-controller attributes. The value of each attribute is a controller class name. Stimulus locates the class, instantiates it, and attaches it to the element.
In addition to controllers, 3 other major Stimulus concepts are:
- actions, which connects controller methods to DOM events using data-action attributes.
- targets, which locate elements of significance within a controller.
- values, which read/write/observe data attributes on the controller’s element.
How to install Stimulus
This gem is automatically configured for applications made with Rails 7+ (unless –skip-hotwire is passed to the generator). But if you’re on Rails 6, you have to install it.
Reminder:
Make sure that your containers are up and running.
In your Gemfile, add gem stimulus-rails.
gem 'stimulus-rails'
Afterwards, run bundle install.
$~/KodaCamp> docker-compose exec app bash
root@0122:/usr/src/app# bundle install
...
Installing stimulus-rails 1.2.1
Bundle complete! 17 Gemfile dependencies, 79 gems now installed.
Use `bundle info [gemname]` to see where a bundled gem is installed.
Then run rails stimulus:install.
root@0122:/usr/src/app# rails stimulus:install
Create controllers directory
create app/javascript/controllers
create app/javascript/controllers/index.js
create app/javascript/controllers/application.js
create app/javascript/controllers/hello_controller.js
...
Done in 25.17s.
To learn more about other type of installation, go to Stimulus Installations.
Hello, Stimulus
Building a basic controller is the greatest approach to learning how Stimulus works. This section will demonstrate how to do it.
Modify Welcome Page
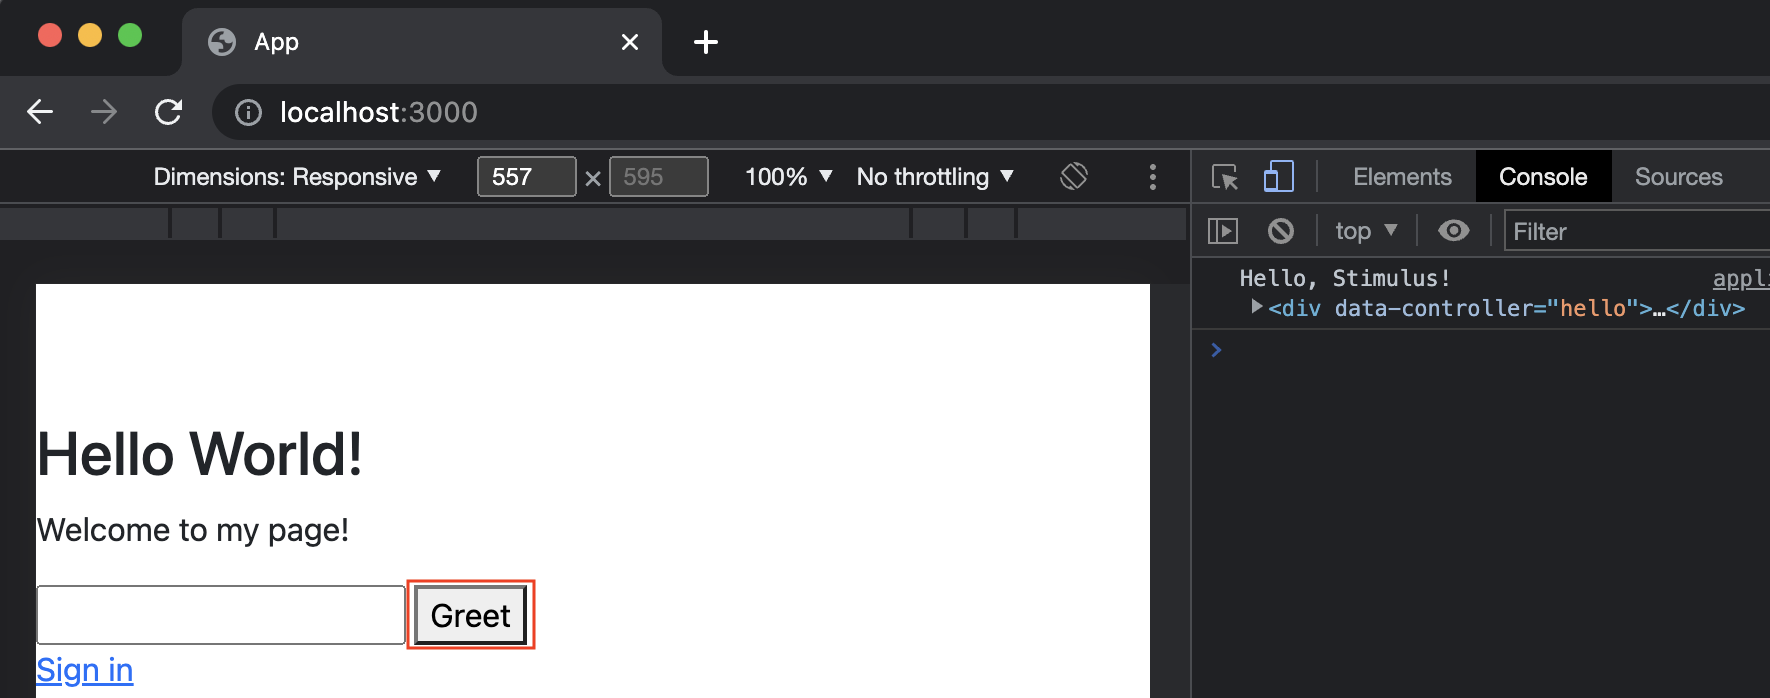
Let’s start with a basic exercise that involves a text field and a button. When you click the button, we’ll display the value of the text box in the console.
HTML is the foundation of every Stimulus project. Open the welcome index view, and add an input type text together with a button with.
<!-- app/views/welcome/index.html.erb -->

<h1>Hello World!</h1>
<p>Welcome to my page!</p>

<div>
  <input type="text">
  <button>Greet</button>
</div>

<!-- ... -->
Hello Controller
At its core, Stimulus’s objective is to automatically bind DOM elements to JavaScript objects. These objects are known as controllers. Upon installing stimulus, it will create a sample hello controller that can be located at app/javascript/controllers/hello_controller.js.
We will replace the content of connect() method with log statement Hello World!.
// app/javascript/controllers/hello_controller.js

import { Controller } from "@hotwired/stimulus"

export default class extends Controller {
  connect() {
-   this.element.textContent = "Hello World!"
+   console.log("Hello, Stimulus!", this.element)
  }
}
The connect method is called each time a Stimulus controller is connected to the document.
Attach Hello Controller
Next, we need to tell Stimulus how this controller should be connected to our HTML. We can do it by placing an identifier in the data-controller attribute on any HTML element, in our case, we will attach it to our <div> in welcome index view.
<!-- app/views/welcome/index.html.erb -->

<h1>Hello World!</h1>
<p>Welcome to my page!</p>

<div data-controller="hello">
  <input type="text">
<!-- ... -->
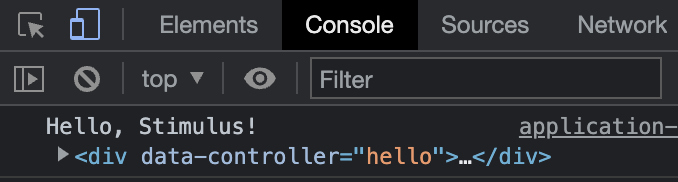
Now run the server and check the welcome page. To see if its working or not, we can check the logs we put earlier on developer console.
To open developer console, right click on page then select inspect and it will open the developer tools.

Under the developer tools, click the console tab.

Controller Action
Let’s modify the code so that our log message displays when we click the Greet button.
Start by renaming method connect() to greet() in our HelloController.
// app/javascript/controllers/hello_controller.js

import { Controller } from "@hotwired/stimulus"

export default class extends Controller {
- connect() {
+ greet() {
    console.log("Hello, Stimulus!", this.element)
  }
}
When the button’s click event is triggered, we want to call the greet() function. Controller methods like this, that handle events in Stimulus are referred to as action methods.
To connect our action method to the button’s click event. Open the welcome index view and add a data-action attribute to the button.
<!-- app/views/welcome/index.html.erb -->

<h1>Hello World!</h1>
<p>Welcome to my page!</p>

<div>
  <input type="text">
- <button>Greet</button>
+ <button data-action="click->hello#greet">Greet</button>
</div>

<!-- ... -->
Go back to your browser, reload the welcome page and open the developer console. When you click the Greet button, you should see the log message appear.
Read Carefully:
The data-action value
click->hello#greetis called an action descriptor. The descriptor says:
clickis the event name.hellois the controller identifier.greetis the name of the method to invoke.
Targeting Elements
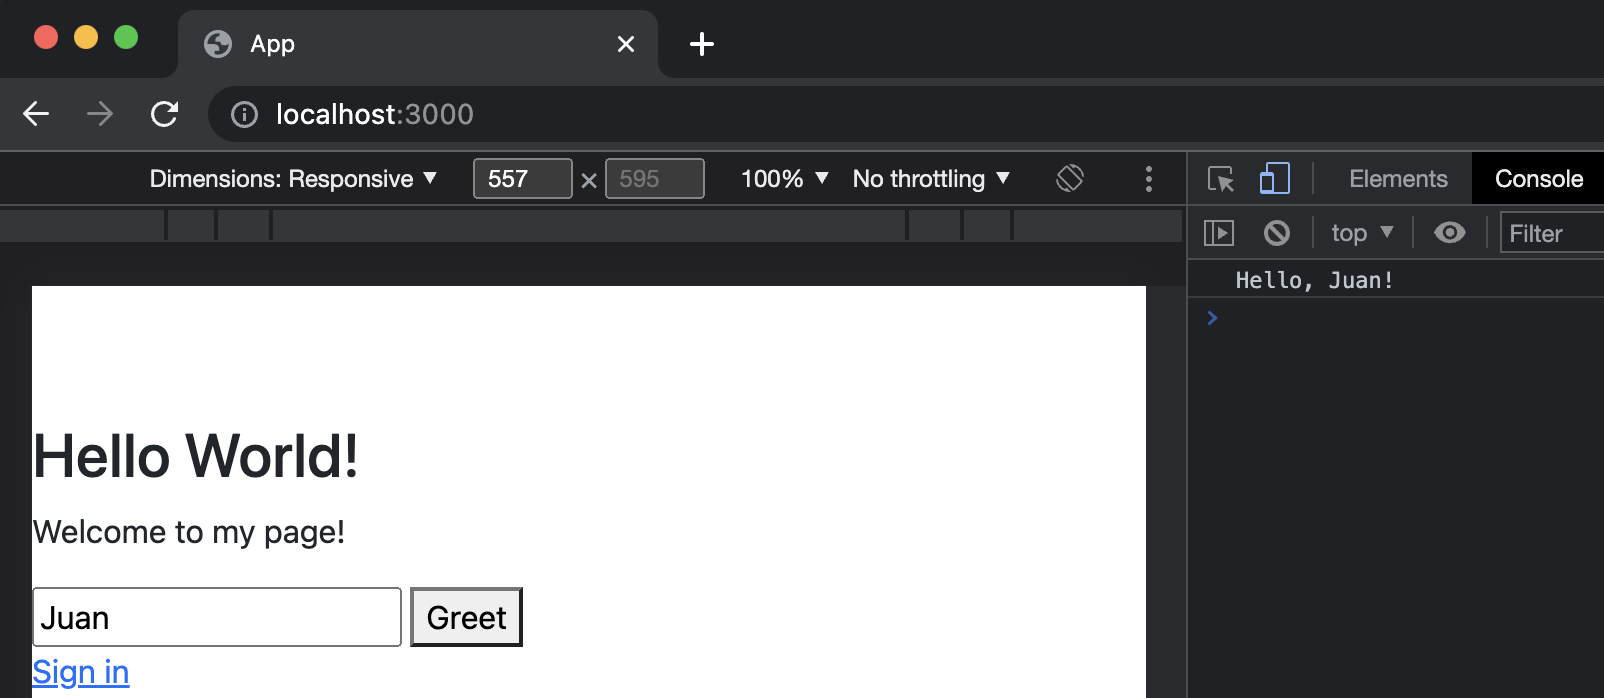
We’ll end this article by updating our action to say hello to whatever we put in the text field. In order to achieve this, first we need a reference to the input element inside our controller. The value property’s contents can then be read.
Read Carefully:
Stimulus allows us to mark significant components as
targets, allowing us to conveniently refer to them in the controller via associated attributes.
Open welcome index and add a data-hello-target attribute to the input element.
<!-- app/views/welcome/index.html.erb -->

<h1>Hello World!</h1>
<p>Welcome to my page!</p>

<div>
- <input type="text">
+ <input type="text" data-hello-target="name">
  <button data-action="click->hello#greet">Greet</button>
</div>

<!-- ... -->
Next, we’ll add name to our controller’s list of target definitions to establish a property for the target.
Read Carefully:
Stimulus will automatically construct a
this.nameTargetproperty that returns the first target element that matches. We can utilize this attribute to read the element’s value and generate our welcome string.
Open hello_controller.js and change it to:
// app/javascript/controllers/hello_controller.js

import { Controller } from "@hotwired/stimulus"

export default class extends Controller {
+ static targets = [ "name" ]

  greet() {
-   console.log("Hello, Stimulus!", this.element)
+   const element = this.nameTarget
+   const name = element.value
+   console.log(`Hello, ${name}!`)
  }
}
Refresh your browser and keep the developer console open. Enter your name in the input field and click the Greet button.
That’s all for our Stimulus introduction.